
Main Courses
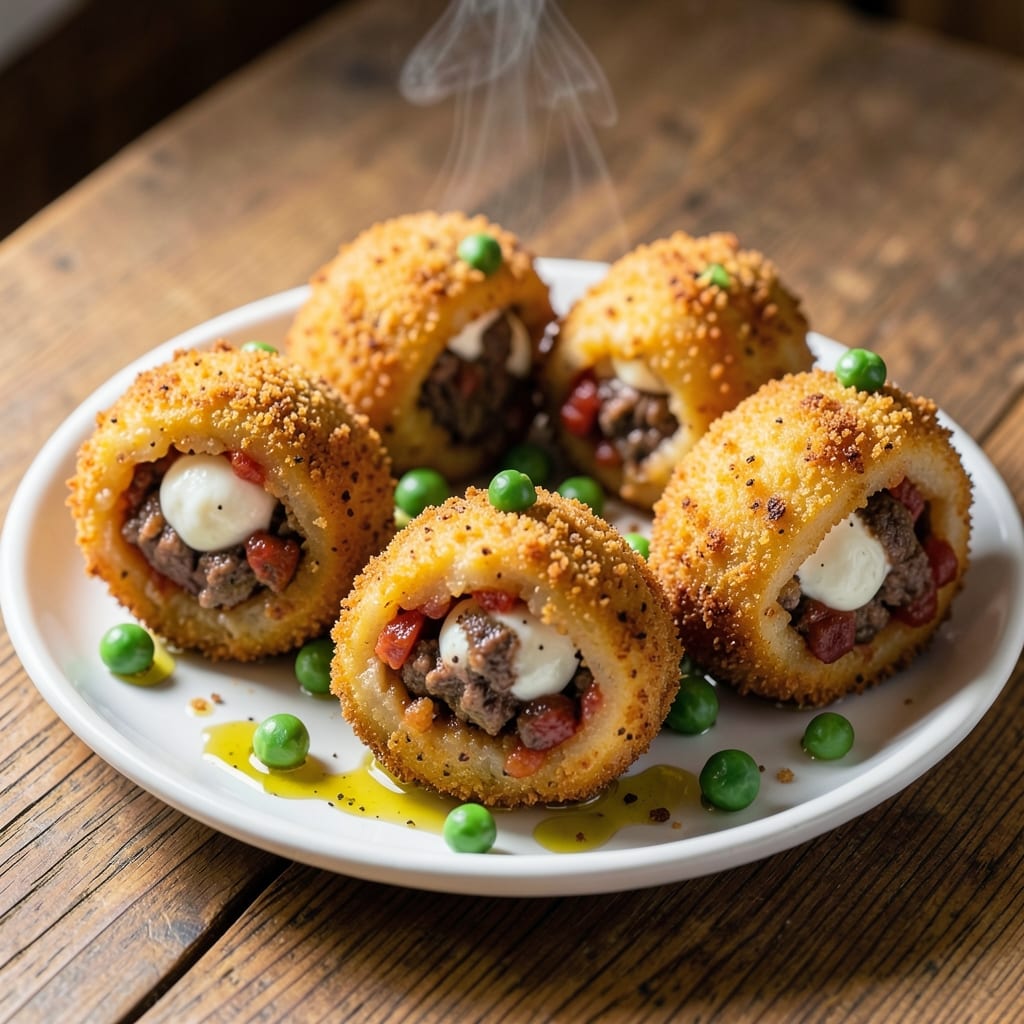
This arancini rice recipe delivers the ultimate Sicilian street food experience right in your kitchen—golden, crispy fried balls with gooey mozzarella hearts and savory ragù filling. The secret lies in perfectly cooked Arborio rice (1:1 rice-to-liquid ratio) that stays firm enough to hold its shape while frying, paired with a breadcrumb crust that creates that addictive crunch. I've perfected this technique over years of testing, ensuring every bite delivers that perfect balance of textures and flavors.
The magic happens in three key steps: preparing the ragù filling with ground beef, peas, and tomato paste; shaping the rice mixture into tight balls around mozzarella pearls; and frying them in hot oil until golden brown. What makes these arancini truly special is how the crispy exterior gives way to warm, melty cheese and herby ragù—each bite is a little taste of Sicily. The breading technique I use creates that signature crunch without absorbing too much oil, making them lighter than traditional versions.
By the time you're done, you'll have a plate of restaurant-quality arancini that's perfect for appetizers, game day, or a special Italian feast. Serve them warm with marinara sauce or caponata for dipping, and watch them disappear faster than you can say "buon appetito." The aroma alone will have everyone asking for seconds—these are the kind of fried bites that become instant favorites.
This recipe works equally well for traditional versions or vegetarian adaptations using plant-based mozzarella. The same shaping and frying techniques apply, ensuring that crispy exterior and melty center you love. Whether you're making them for a crowd or just treating yourself, these arancini deliver that perfect combination of comfort and indulgence that makes Italian street food so irresistible.
Ingredients for arancini rice
Golden, crispy arancini start with these 15 essential ingredients—each playing a star role in Sicily's ultimate street food.
| Ingredient | Amount | Notes |
|---|---|---|
| Arborio Rice 🍚 | 1 cup | Uncooked, for perfect al dente texture |
| Ground Beef 🥩 | ½ lb | 80% lean, finely ground for ragù |
| Frozen Peas 🌱 | ½ cup | Thawed, for filling texture contrast |
| Tomato Paste 🍅 | 2 tbsp | High-quality, for rich flavor base |
| Fresh Mozzarella Pearls 🧀 | 1 cup | Store-bought or hand-rolled balls |
| Italian Seasoned Breadcrumbs 🍞 | 2 cups | Panko-style for extra crunch |
| Large Eggs 🥚 | 2 whole | Room temperature for even coating |
| Vegetable Oil 🫒 | 3 cups | High smoke point for frying |
| Chicken Broth 💧 | 1 ½ cups | Low-sodium for rice cooking |
| Grated Parmesan Cheese 🧀 | ¼ cup | Freshly grated for umami depth |
| Fresh Basil Leaves 🌿 | ¼ cup | Chopped fine for herbaceous finish |
| Garlic Cloves 🧄 | 2 cloves | Minced for ragù aromatic base |
| Salt 🧂 | 1 ½ tsp | Kosher salt for seasoning |
| Black Pepper 🌶️ | ½ tsp | Freshly cracked for heat |
| Olive Oil 🫒 | 1 tbsp | Extra-virgin for ragù richness |
The Arborio rice is non-negotiable—it's the secret to that perfect al dente texture that stays firm when fried. Lundberg or Barilla are my go-tos, but any Arborio will work. For the ground beef, grab the leanest 80% you can find—it keeps the ragù flavorful without making the arancini greasy. I always double-check the mozzarella pearls at Whole Foods or Trader Joe's—they should be plump and milky, not rubbery. The breadcrumbs? Panko-style gives that signature crunch, but if you're in a pinch, regular Italian breadcrumbs work too (just toast them first).
No mozzarella pearls? Fresh mozzarella cut into small cubes works in a bind, though they won't be as pretty. Short on time? Pre-made ragù sauce from Rao's or Barilla cuts prep time in half—just boost the tomato paste to 3 tbsp. The peas can be fresh or frozen, but thaw them completely before mixing. For the vegetable oil, Crisco or generic store-brand both work great—just avoid anything with a low smoke point. And if you're making these vegetarian? Swap the beef for lentils or mushrooms and use vegan mozzarella—the technique stays exactly the same.
Keep your rice mixture covered in the fridge for up to 2 days—it actually improves overnight. The mozzarella pearls? Store them in their brine until ready to use. For frying, maintain oil temp at 350°F—a candy thermometer is worth the investment. These stay crispy for 1 hour after frying if kept warm in a 200°F oven, so make extras! Leftovers? Reheat in 375°F oven for 10 minutes—they won't be quite as crispy but still taste amazing. Freeze uncooked arancini on a tray first, then transfer to a bag for 1 month storage.
Why You'll Love This Recipe
- One-Pot Magic: I swear by this—just brown the beef, toast the rice, and let it simmer. No chopping, no fussing, no extra pans. The tomato paste and peas blend right in while you handle the rest of dinner.
- Creamy Crunch Payoff: That crispy exterior from the breadcrumbs? Chef’s kiss. But the real magic’s inside—Arborio rice soaks up the beefy, herby sauce, then melts with mozzarella pearls when you bite in. Textures don’t get better than this.
- Game for Any Day: Pack these for lunch or serve them at a picnic—they’re sturdy enough to travel but feel fancy enough for company. (Yes, even on a Tuesday night.) Freezer-friendly too, so make a batch and thank future-you later.
- Budget Win: Ground beef, Arborio rice, and frozen peas? This feeds four for under $10. No splurges, no waste—just hearty, satisfying bites that disappear faster than my willpower when I’m hungry.
Step-by-step instructions for arancini rice balls
Let's create golden, crispy arancini with gooey mozzarella centers—every bite will be perfection.
Cook the Perfect Ragù for the Rice
Heat the 1 tablespoon olive oil in a medium saucepan over medium heat. Add the 0.5 lb ground beef and cook, breaking it apart with a wooden spoon, until it loses its raw color and becomes browned—about 5-6 minutes. This step develops deep, meaty flavor.
Push the beef to one side of the pan and add the 2 cloves minced garlic. Sauté for 30 seconds until fragrant, then add the 2 tablespoons tomato paste and stir to combine. Pour in the 1.5 cups chicken broth and bring to a gentle simmer. Let it reduce by half—about 8-10 minutes—until it thickens slightly and coats the back of a spoon.
Remove from heat and stir in the 0.5 cup thawed frozen peas, 0.25 cup grated Parmesan cheese, 1.5 teaspoons salt, and 0.5 teaspoon black pepper. Set aside to cool slightly—this flavorful base will transform your rice into something extraordinary.
Prepare the Al Dente Arborio Rice
In a separate pot, bring 1.5 cups water to a boil. Add the 1 cup Arborio rice and stir once to prevent clumping. Reduce heat to low and let it simmer uncovered for 12-14 minutes, stirring occasionally—about every 3 minutes—until the rice is al dente and most of the liquid has been absorbed.
Turn off the heat and let the rice sit covered for 5 minutes. Then fluff with a fork and gently mix in the cooled ragù until fully incorporated. The rice should be moist but not mushy—this is key for the perfect arancini texture. If it feels too dry, add 1-2 teaspoons water to restore moisture.
Assemble the Arancini with Mozzarella Hearts
Divide the rice mixture into 4 equal portions (about 1 cup each) and shape each into a smooth ball. Using your thumb, press a deep dimple into the center of each ball. Place 1 mozzarella pearl into each dimple and gently press the rice back over it to fully enclose the cheese—this ensures a gooey surprise with every bite.
Roll each arancini between your palms to create a smooth, round shape. If the rice feels sticky, wet your hands slightly to prevent sticking. Arrange them on a plate and refrigerate for 30 minutes—this chilling step makes the coating adhere better and prevents them from falling apart during frying.
Create the Perfect Crispy Coating
In a shallow bowl, beat the 2 large eggs with a fork until just combined. In another bowl, place the 2 cups Italian seasoned breadcrumbs. Working with 4 arancini at a time, dip each one into the egg wash, letting excess drip off, then roll thoroughly in the breadcrumbs, pressing gently to ensure full coverage.
Place the coated arancini on a wire rack set over a baking sheet. Let them rest for 10 minutes—this allows the coating to set up slightly, preventing it from sliding off during frying. The breadcrumbs should cling tightly and look uniformly crisp.
Fry to Golden Perfection
Heat 3 cups vegetable oil in a deep skillet or Dutch oven to 350°F—use a thermometer to monitor the temperature. Working in batches of 2-3 arancini (to avoid overcrowding), carefully lower them into the oil. Fry for 3-4 minutes until they turn a deep golden brown and float to the surface.
Use a slotted spoon to remove the arancini and drain on a wire rack or paper towels. Let them rest for 2 minutes before serving—this brief rest ensures the crispy exterior stays intact. Garnish with chopped fresh basil leaves just before serving for a bright, herby finish.
Serve immediately while the breading is still crispy and the mozzarella is molten inside. The contrast of the crunchy exterior and creamy center makes these arancini irresistible—every bite is a little taste of Sicily!
Pro Tips For Making Arancini Rice
- Toast the Beef First: Cook the ground beef until it’s deep brown, not just pink—this adds richness that cuts through the creaminess of the mozzarella later. I used to skip this, and the flavor felt flat until I realized how much difference a proper sear makes. ---
- Thaw Peas Properly: Dump frozen peas straight into boiling water for 1 minute, then shock them in ice water before mixing into the rice. This keeps them bright green and prevents the filling from turning mushy—no one wants a sad, waterlogged arancini. ---
- Keep the Rice Al Dente: Pull the Arborio off heat when it’s just tender*—about 2 minutes before the package says "done." It’ll finish cooking in the filling, and undercooked rice turns gummy when fried. Trust the texture, not the clock. ---
- Chill Before Frying: Let the shaped arancini rest in the fridge for 30 minutes before frying—this firms up the mozzarella and prevents them from falling apart. I learned this after watching my first batch crumble like wet sand. (Yes, it’s annoying, but it works.)
Health benefits of this arancini rice
Protein Powerhouse
Arancini pack a serious protein punch with 12-15 grams per serving, thanks to the Arborio rice and ground beef combination. This makes them an excellent choice for muscle recovery after workouts or as a satisfying snack that keeps you full for hours. The mozzarella pearls add an extra 5 grams of protein per serving, plus calcium for bone health. 💪
Complex Carbs for Energy
The Arborio rice provides slow-digesting complex carbohydrates that fuel your body with sustained energy—perfect for game day or busy weeknights. These carbs pair beautifully with the protein to create a balanced meal that stabilizes blood sugar levels. The peas add fiber for digestion, making these arancini a surprisingly nutritious indulgence.
Cheese Benefits
Each serving delivers 8-10 grams of calcium from the mozzarella and Parmesan, supporting bone health and muscle function. The mozzarella pearls also provide vitamin B12 and phosphorus, essential for energy metabolism. I always choose fresh mozzarella for maximum creaminess and nutritional benefits compared to processed versions.
Herb-Rich Nutrition
Fresh basil adds more than just flavor—it contributes vitamin K and vitamin A, both important for immune function and skin health. The garlic in the ragù provides antioxidant properties that support heart health. Even though these taste like comfort food, they're secretly packed with nutrients that make them a smart choice.
Balanced Fat Profile
The breadcrumb coating and frying process add flavorful fats, but the lean ground beef and vegetable oil used for frying keep saturated fat levels moderate. For a lighter version, I sometimes use half olive oil and half vegetable oil for frying—this maintains crispiness while slightly reducing saturated fat content. The result is still indulgent but with a more balanced fat profile.
Vegetarian Adaptation
For a plant-based version, swap the ground beef for lentils or mushrooms and use vegan mozzarella to maintain the same protein and calcium benefits. This adaptation still delivers 10 grams of protein per serving while keeping all the other nutritional advantages of the original recipe. The texture remains satisfying, and the flavor profile adapts beautifully to vegetarian preferences.
Nutrition facts
Frequently asked questions
Can I make arancini without frying them?
Yes! For a lighter version, bake them at 400°F for 15-18 minutes on a wire rack over a baking sheet. Brush with olive oil first for crispiness. The texture won't be as crispy as fried, but they'll still be delicious. Pro tip: Flip halfway for even browning.
What's the best way to store leftover arancini?
Store cooked arancini in an airtight container at room temperature for 1 day. For longer storage, refrigerate for up to 3 days or freeze uncooked ones for 1 month. Reheat frozen arancini at 375°F for 10-12 minutes—they'll lose some crispiness but still taste amazing.
Why did my arancini fall apart when frying? This usually happens when the rice is overcooked (too mushy) or undercooked (too dry). Use Arborio rice and follow the 1:1 rice-to-liquid ratio exactly. Also,
Can I make vegetarian arancini?
Replace the ground beef with 1 cup cooked lentils or 8 oz mushrooms (finely chopped and sautéed). Use vegan mozzarella and add 1 teaspoon nutritional yeast to the ragù for extra cheesy flavor. The shaping and frying technique stays exactly the same!
How many arancini should I make per person?
Plan for 4-6 arancini per person as an appetizer or snack. For a main course, double that amount. These are addictive—always make extras! They freeze well before cooking, so you can prep ahead for gatherings.